Dependencies
OpenFlipper is developed on top of the Qt framework. This framework provides easy cross platform development. Therefore an installed version of QT with at least version 4.8.6 is required. We use the cmake MakeFile generator to build OpenFlipper.
Required libraries
Optional libraries ( Without these libraries some functionality might not be available)
Build System
The build system uses cmake to generate all makefiles.
Building OpenFlipper using Cmake
For the following section CMake >= 2.8.4 has to be installed. In the toplevel directory of OpenFlipper is a CMakeLists.txt file that specifies the build configuration and targets. In most cases this file should be left untouched. Additional functions and environment settings are to be found in the cmake directory in the toplevel folder. See following subsections for information on how to build OpenFlipper for your specific operating system.
Building OpenFlipper under Linux
-
First install the required libraries via your linux distributions package management e.g. apt or rpm (for the list of packages see above)
-
Extract the source code or get it via svn:
svn co http://www.openflipper.org/svnrepo/OpenFlipper/branches/Free OpenFlipper
-
Create a build directory (e.g. build) in the toplevel directory:
mkdir build
-
Change to the newly created directory
cd build and type cmake ..
-
Now call make to build OpenFlipper
To switch between debug and release build, use
cmake -DCMAKE_BUILD_TYPE=Release ..
To change the install path use
-DCMAKE_INSTALL_PREFIX=[path]
The created application (binaries, libs and shared files) are located in the Build directory.
Building OpenFlipper under Windows
-
Get Visual Studio 2008/2010
-
Get and Install Qt ( >= 4.8.6 , Visual Studio Version matching your installation )
-
Set the QTDIR Variable to your Qt Installation directory:
-
For Qt5, you need to add the value "%QTDIR%/bin" to the "Path" variable. Keep in mind: The "QTDIR" variable is the path which includes the "bin", "include", "lib", ... directories.
Windows Vista/7:
Open the Control Panel
Select System and Security -> System -> Advanced System settings
Click on "Advanced" tab
At the bottom click on "Environment Variables"
In the bottom window,check if there is already a QTDIR entry and modify it or use "Add" to create it
Set the path to your QT installation directory
Windows XP:
Open the Control Panel
Select System
Click on "Advanced" tab
At the bottom click on "Environment Variables"
In the bottom window,check if there is already a QTDIR entry and modify it or use "Add" to create it
Set the path to your QT installation directory
-
Extract OpenFlipper source code. ( If you want to use svn you can get a free svn client from http://tortoisesvn.net/downloads )
-
Download the glew library and install it (The best way is to install it to c:\libs\glew directory ).)
The c:\libs\glew\lib subdirectory should contain the dll and the *.lib files)
The headers should be located in the c:\libs\glew\include\gl subdirectory
-
Rearrange the files in the glut-3.7 directory such that)
all *.lib and *.dll files are in a c:\libs\glut-3.7\lib subdirectory)
and the glut.h file is moved to the subdirectory c:\libs\glut-3.7\include\gl\glut.h
-
Get cmake for windows from http://www.cmake.org/cmake/resources/software.html
-
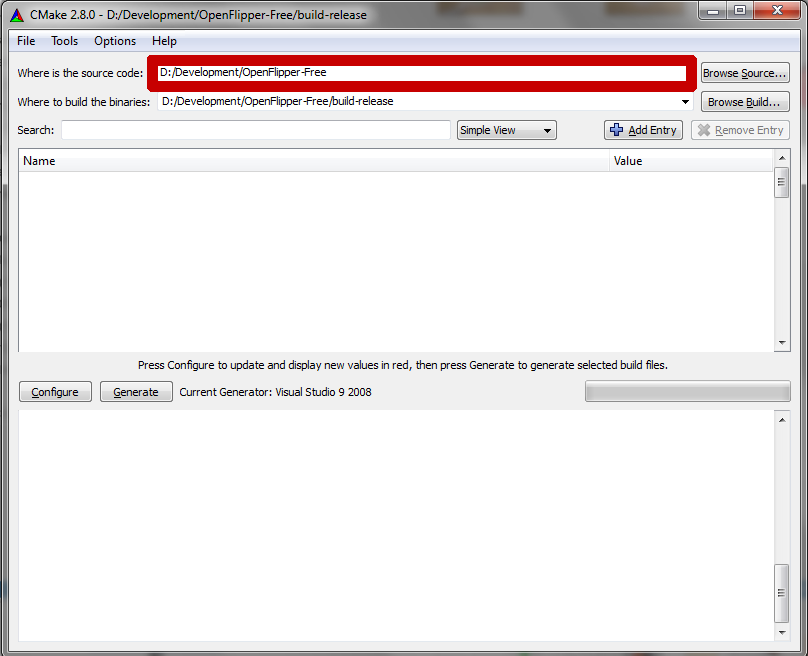
Start the cmake gui and select the OpenFlipper toplevel directory as source directory
-
Choose a build directory (e.g. a subdirectory called
build-release in OpenFlipper's root dir)
-
Click on configure
-
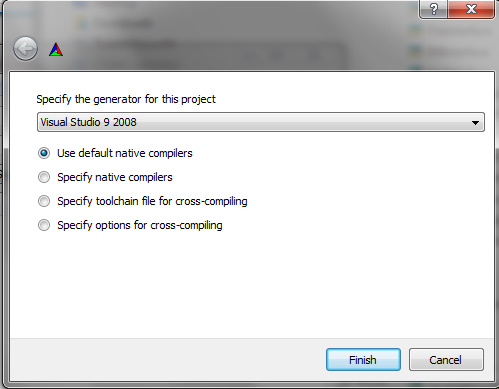
Choose a generator for Visual Studio (according to your Visual Studio version)....
-
If the configuration fails because of libraries and/or headers which have not been found, an error message will be printed in the bottom window. You can adjust the paths in cmake-gui manually in the large window. Note that some build variables are only visible in Advanced Mode. You can change view modes of cmake-gui via the select box on the top.
-
Rerun configure until everything is configured correctly and no more red rows or errors are shown.
-
Click generate to create the visual studio project files
-
You can now find a Visual Studio solution file (OpenFlipper.sln) in the build directory directory you chose in cmake.
-
Now you can build OpenFlipper from within Visual Studio using the newly created project file by starting Build Solution.
- Note
- If you want to build OpenFlipper as release on windows, you don't have to set the CMAKE_BUILD_TYPE variable to "Release" before configuring generating the Visual Studio solution file. Instead, choose the build type "Release" in Visual Studio and build the solution.
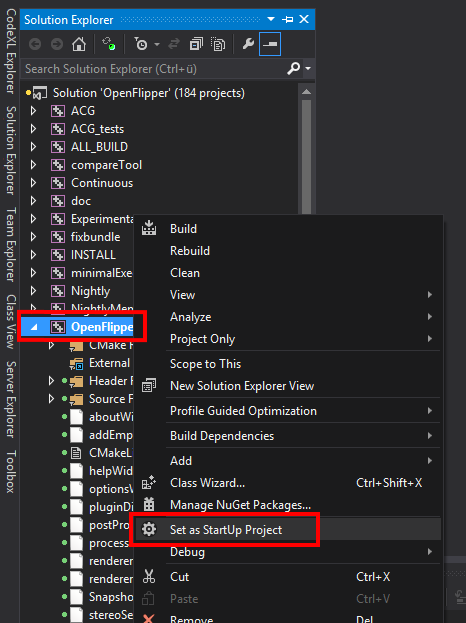
Don't forget setting up the "OpenFlipper" target as startup project as shown in the image below to run the debugger with OpenFlipper right out of Visual Studio.
Building OpenFlipper under MacOS X
-
First install the required libraries
To get all required libraries you should use the macports project: http://www.macports.org/
Install at least the following ports:
qt4-mac +debug
glew
glut
cmake
br /> As additional ports we recommend the following
fftw-3
qwt-60 +debug +qt4
subversion
doxygen
-
Extract the source code or get it via svn:
svn co http://www-i8.informatik.rwth-aachen.de/svnrepo/OpenFlipper/branches/Free OpenFlipper
-
Create a build directory (e.g. build) in the toplevel directory:
mkdir build
-
Change to the newly created directory (
cd build ) and type cmake .. or if you want to build in release mode type cmake -DCMAKE_BUILD_TYPE=Release ..
You can also enable bundle creation by adding -DOPENFLIPPER_CALL_FIX_BUNDLE=true to the cmake command line (If you want a bundle containing all required libraries. Otherwise, the libraries will be used at their original locations.)
-
Now call make to build OpenFlipper
The created application bundle can be found in the Build directory. If you build with -DOPENFLIPPER_CALL_FIX_BUNDLE=true, the bundle will contain all required libraries.
You can also create a drag and drop installer for mac by calling make OpenFlipper_package. This will also call fixbundle on your Bundle. Note: When fixbundle has been called, the rpaths will be switched to local libraries. Concurrent builds, will still reference the global ones, which will cause inconsistencies and crashes! You have to call fixbundle after each build if it has been called once.
Building OpenFlipper Plugins with CMake
Building plugins with CMake is very simple. The OpenFlipper CMake build system expects a CMakeLists.txt file in each of the plugin's directories. So when developing a plugin, just make sure there is a CMakeLists.txt in your plugin's directory. In this file include the global file plugin.cmake which specifies the openflipper_plugin() function:
include(plugin)
You then have to add the following line which configures the build parameters of your plugin:
openflipper_plugin()
Note: There are several parameters that one can pass to this function. Usage:
openflipper_plugin ( [DIRS dir1 dir2 ...]
[DEPS dep1 dep2 ...]
[OPTDEPS dep1 dep2 ...]
[LDFLAGSADD flag1 flag2 ...]
[CFLAGSADD flag1 flag2 ...]
[LIBRARIES lib1 lib2 ...]
[LIBDIRS dir1 dir2 ...]
[INCDIRS dir1 dir2 ...]
[ADDSRC file1 file2 ...]
[INSTALLDATA dir1 dir2 ...]
[TRANSLATION_LANGUAGES lang1 lang2 ...]
[TRANSLATION_ADDFILES file1 file2 ...]
[LICENSEMANAGER])
DIRS = additional directories with source files
DEPS = required dependencies for find_package macro
OPTDEPS = optional dependencies for find_package macro, if found, define ENABLE_<Depname> will be set automatically
LDFLAGSADD = flags added to the link command
CFLAGSADD = flags added to the compile command
LIBRARIES = libraries added to link command
LIBDIRS = additional link directories
INCDIRS = additional include directories
ADDSRC = additional source files
INSTALLDATA = directories that will be installed into the openflipper data directory
TRANSLATION_LANGUAGES = language codes for translation
TRANSLATION_ADDFILES = additional files that should be included into the translation files
LICENSEMANAGER = Compile plugin with license management
Plugins can implement a acg_list_filter ("listname") macro to filter out
unneeded headers, sources and ui files from the autogenerated
build sources lists (see common.
cmake drop_templates macro)
Translations
Create a subdirectory called translations in your Plugin directory
The *.ts files there will be used for the translations
Special DEPS:
CUDA:
If your plugin requires cuda, add "CUDA" to the list of dependencies
and create a subdir called Cuda in your plugin directory
The files in this directory will be compiled by nvcc and linked
into the plugin
For a detailed description of the parameters see the CMake documentation. For an example of how to build a simple plugin see A simple plugin.


 1.8.8
1.8.8 
